

Key takeaways
- Set up an inversion table by assembling it exactly as the manual shows on a flat, clear floor, then adjust the height setting to the user's height.
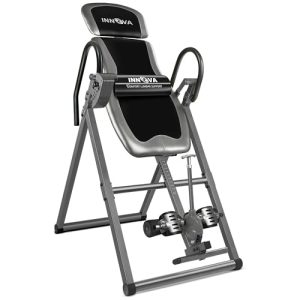
Set up an inversion table by assembling it exactly as the manual shows on a flat, clear floor, then adjust the height setting to the user’s height, secure the ankle holders, and set the rotation limit before the first use. Always begin at a very small tilt, and talk to a clinician first if you have any medical condition that inversion might affect.
The steps below follow the order most manuals use, with extra notes on where people tend to rush. They are general, so treat your own manual as the final word on bolt sizes, pin positions, and weight limits. Planning the setup in 2026 or any other year works the same way: slow, methodical, and checked twice.
Choose the Spot Before You Unbox
An inversion table needs more room than its folded size suggests. Clear the floor where the frame will stand, then check the space around it for the swing: the user’s head moves lower than their feet, and the feet travel upward, so you need open space on every side and enough ceiling height for the tallest user.
Pick a level, hard floor, since carpet and uneven surfaces can make the frame rock. Keep the table away from shelves, ceiling fans, and low light fixtures, and make sure nothing sits behind the head end where it could be struck during rotation. If the floor is slick, a mat under the feet can help hold the frame in place. Measure twice: floor length, ceiling height, and the clear zone beside the table, because a spot that looks roomy while the table is folded can feel tight once the bed swings through its range.
Assemble the Frame Carefully
Lay out and sort the parts
Open the box on the floor, lay out the frame sections, hardware, and tools, and compare them with the parts list. Missing or damaged pieces should be resolved with the seller before you start, not improvised around.
Tighten in the right order
Follow the manual’s sequence and keep bolts loose until the frame is fully lined up, then tighten them evenly. Over-tightening one side first can bind the frame, and under-tightening leaves play in the joints. Finish by going around once more to confirm every fastener is snug.
Check the pivot and locks
Before anyone gets on, move the bed through its range by hand. It should rotate smoothly, the locking mechanism should hold when engaged, and no part should rub or catch. If something feels stiff or loose, stop and fix it instead of adjusting around it.
Adjust the Table to the User
Set the height
Most tables use a pin or similar mechanism matched to the user’s height. Select the setting that matches the chart in your manual, then confirm it is fully seated. A wrong height setting changes the balance point, which changes how easily the table rotates.
Set the ankle holders
The ankle holders should wrap around the lower leg securely without pinching. Step in, lock them, and shift your weight gently to confirm they hold. If the user’s shoes or clothing change the fit, adjust again.
Set the rotation limit
Many tables include a strap or limiter that restricts how far the bed can tilt. Set it so the first tilt is shallow, and increase only as the user becomes comfortable. Make sure the limiter is secure and that the user can release it easily.
Your First Sessions
Start with the bed nearly upright and the user standing on the platform. Lock in, rest the arms as the manual describes, and tilt back only a short way. Hold for a very short time, then return upright slowly and rest before stepping out. Moving too fast on the way back can cause lightheadedness. Treat the first week as practice for the controls rather than the stretch itself, learning how the release feels and how the limiter responds before pushing the angle.
Increase the angle and the time in small steps over several sessions, and stop at any discomfort, dizziness, or pressure in the head or eyes. Keep a second person nearby for the first few uses, and do not use the table alone until the controls feel automatic. People with heart, eye, blood pressure, or spine conditions, and anyone who is pregnant, should get advice from a clinician before any use.
Fine-Tuning and Troubleshooting
Once the table is assembled and set, small adjustments make the difference between a table you use and one that gathers dust. Make one change at a time and return to a shallow tilt after each, so you can tell which adjustment produced which effect.
- If the bed tips back too easily, the height setting may be too low for the user, so recheck the chart and the pin position.
- If the bed resists rotating or feels heavy to start, the setting may be too high, or the pivot may need a cleaning and a check for binding.
- If the ankle holders slip or pinch, readjust their position and padding rather than overtightening them.
- If the frame wobbles, recheck the floor and the leveling feet, then tighten each bolt again in sequence.
- If a strap frays or a pin sticks, stop using the table and contact the manufacturer for a replacement part.
When two users share a table, write the settings for each person on a card kept near the table. That small habit prevents the common slip of using the previous user’s height pin.
Keeping the Setup Safe Over Time
Setup is not a one-time job. Hardware loosens with use, and foam wears with repeated contact. Make a short routine part of every session: look at the frame for cracks or bent tubing, press on each joint, test the locking mechanism with the bed empty, and confirm the strap and limiter work freely.
Store the manual where you can find it, and keep the model number handy for ordering parts. If you move the table, recheck the leveling and bolts afterward, because transport can shift joints. Avoid leaving the table in damp areas where metal parts can corrode or foam can break down, and wipe down contact surfaces so grips stay secure.
Setup Checklist at a Glance
| Step | What to check | Why it matters |
|---|---|---|
| Location | Level floor, clear space, ceiling clearance | Prevents rocking and collisions |
| Assembly | All bolts snug, frame square | Keeps the frame stable under load |
| Height setting | Pin fully seated at the chart value | Controls balance and rotation |
| Ankle holders | Locked, snug, not pinching | Holds the user securely |
| Rotation limit | Set shallow and easy to release | Keeps early sessions gentle |
Before You Start
- Read the manual fully, including weight and height limits.
- Clear a flat area with room above, around, and behind the table.
- Gather the tools the manual calls for.
- Talk to a clinician about whether inversion suits you.
- Plan for a second person to be nearby for the first sessions.
- Wear secure, non-slip footwear for stepping on and off.
Related guides
- How To Use An Inversion Table For Beginners Angle Time And Safety
- How Often To Use A Massage Gun Duration And Recovery Guide
- Inversion Tables For Seniors With Limited Mobility
Frequently Asked Questions
How long does assembly usually take?
It varies by model, but plan for a calm session with the manual at hand rather than a rushed one. Taking extra time to check each fastener is better than hurrying and missing a loose joint. A second pair of hands helps when lifting frame sections into position.
How do I know the height setting is right?
Match the user’s height to the chart in the manual and confirm the pin or lock is fully seated. When the setting is correct, the bed should tilt with gentle effort and settle without lurching.
Do I need to re-adjust if two people use the table?
Yes. Height, ankle-holder fit, and rotation limit are personal, so re-set each one for every user and confirm the locks before each session. Even a small difference in height or boot size can change how the table feels.
How often should I check the hardware?
Check the bolts, pins, straps, and ankle holders before each use for wear, loosening, or damage. Replace worn parts through the manufacturer instead of using a damaged table.
More from Amazon
Programs that pair well with the guide above. Offers and eligibility are set by Amazon and may change.
Collect the home and kitchen items you want in one registry that guests can shop from.
Create a wedding registrySet up recurring deliveries of everyday items on eligible products. Terms and savings are set by Amazon.
Explore Subscribe & SaveFree shipping on eligible items, Prime Video and more. Eligible new members can start with a free trial.
Start a Prime free trialAudiobooks and podcasts to listen to on the go. Eligible new members can start with a free trial.
Try Audible freeAs an Amazon Associate we earn from qualifying purchases.






Write Your Review
No reviews yet. Be the first to share your experience!